
Film assistant
Build a scene in Blender
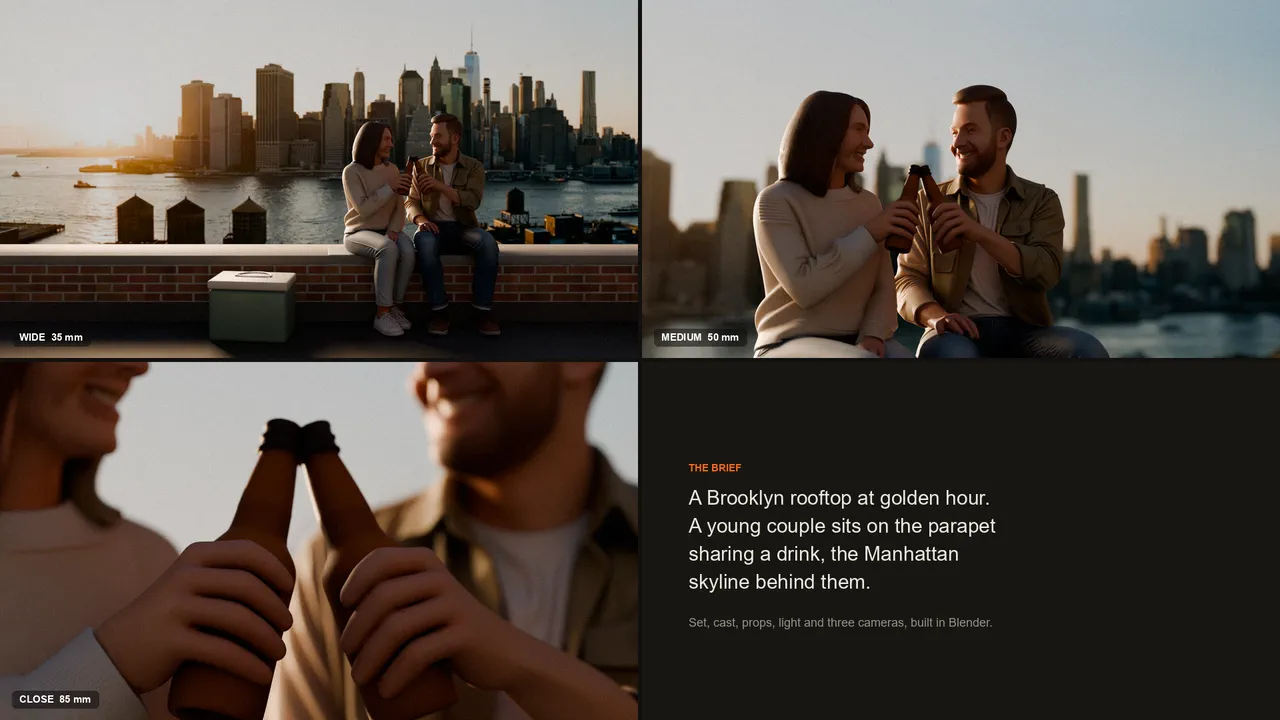
Describe a shot and get it laid out in Blender: the set, the people and props, their poses, the light, and three cameras to choose from.
Runs in Blender on your computer
- Best for
- Storyboards and blocking out a shot before you animate or render.
- Runs in
- Blender 4.2 or later
- Time
- 20 to 40 min
- Cost
- The work in Blender is free. NOLGIA generation inside it is priced as usual.
Already have an account? Sign in
Create a free account and NOLGIA Agent opens with this preset. It works in Blender through the NOLGIA plugin.
Start it from your agent
Paste this into Claude Code, Claude Desktop, Cursor or any agent with NOLGIA connected, with Blender open. The agent follows NOLGIA's workflow for this preset step by step, and asks before it changes anything big.
Use NOLGIA to build a 3D scene in my open Blender file from my brief: the setting, the characters and props, their poses, and three camera angles to choose from.
In Claude Code it is also a command: /mcp__nolgia__blender-scene-builder. Open in Claude needs NOLGIA added to Claude as a connector.
What it does
Tell the NOLGIA assistant what happens in the shot and it builds it in your open Blender file. It writes a short plan first and waits for your go ahead, then blocks out the set at real scale, brings in the characters and props, poses them, lights the scene for the mood and sets up a wide, a medium and a close camera.
Missing a model? It can make one with NOLGIA from a photo or a picture, and it tells you the cost before it does. Everything else happens in Blender and is free.
Everything lands in its own collections, so you can keep directing the scene yourself. You need Blender 4.2 or later and the NOLGIA plugin for Blender.
Use cases
- Planning the shots of a short film or a music video
- Blocking out a storyboard frame in 3D
- Trying three camera angles before a render
The workflow
The written steps your agent follows in Blender, the same for every agent: the rules every Blender workflow keeps (a safety copy first, everything stays editable, a preview after each change), then this preset's own steps.
Read the workflow
Rules for every Blender workflow
These instructions are served to the agent with every Blender preset in the Film assistant category. The agent works through the NOLGIA Bridge tools (nolgia_app_*) on Blender running on the person's own computer.
Before anything changes
- Call
nolgia_app_status. If Blender is not listed, stop and tell the person in two lines: install the NOLGIA plugin for Blender from nolgia.ai/plugins/blender, then press N in the 3D Viewport, open the NOLGIA tab and sign in. Do not guess or continue without it. - Call
nolgia_app_info. Read what is really open: the file, the scene, frame range, fps, render engine, resolution, collections and cameras. Describe it back in one sentence so the person can correct you. - If the file has a path, make a safety copy first with a
nolgia_app_runthat callsbpy.ops.wm.save_as_mainfile(filepath=<same folder>/<name>_before_nolgia.blend, copy=True). If the file was never saved, ask the person to save it (File, Save As) before you start, and wait. - Ask only the questions the workflow lists. Offer a sensible default for each so the person can just say "go".
While working
- Change the scene in small steps: one
nolgia_app_runper logical step, each returning a short summary inresult(names created, counts, frame ranges). - Never delete, rename or move the person's existing objects, materials or collections unless they asked. Put everything you add in a new collection named after the workflow (for example
NOLGIA Destruction). - Keep everything editable: modifiers stay live, simulations stay as cache settings plus a bake, materials stay as nodes with the controls exposed on a labelled group or a clearly named node. No applied modifiers or joined meshes unless the workflow says so.
- After each visible change, call
nolgia_app_previewat a representative frame and look at the image before moving on. If it looks wrong, fix it before the next step. Do not describe a result you have not seen. - Long bakes and renders: run them, and if a tool hands back a
command_id, follow it withnolgia_app_commandinstead of starting it again. - If Python fails, read the traceback in
error, fix the code and try once more. After two failures on the same step, explain what failed in plain words and ask how to proceed.
Blender Python that bites
- Operators act on the view layer's active object and selection, and some (for example
bpy.ops.rigidbody.constraint_add) ignoretemp_override. Before every operator, setview_layer.objects.activeand the selection to exactly the objects you mean, and check afterwards that none of the person's own objects changed. - A driver that reads a custom property added in the same script can evaluate to 0. After adding properties and drivers, call
obj.update_tag()andbpy.context.view_layer.update(), then check every driver'sdriver.is_validand read one driven value back. - Never put keyframes and a driver on the same channel. Key a custom property instead and drive the channel from it.
- Names must be unique in a file: suffix actions, materials and objects you create per part with the part's name.
- Imported models arrive flat shaded and scaled to about 1 m: shade them smooth and scale them to real size. The GLB's Y-up to Z-up turn is stored as a quaternion, so
rotation_eulerreads 0: readrotation_quaternionor the world matrix. - Per-polygon Python loops over a large generated mesh can exceed the command time limit; read and write mesh data with
foreach_get/foreach_setand numpy instead. nolgia_app_exportrenders from the scene camera. To export from another camera, setscene.camerafirst and put it back afterwards.
Using NOLGIA where it helps
- Missing 3D models: generate them with
nolgia_generate_3dfrom a picture the person gives you (or one made withnolgia_text_to_image), then bring them in withnolgia_app_import. - Backgrounds, skies and texture plates: make them with
nolgia_text_to_imageand import them as images. - These generations cost credits: say what you are about to make and roughly what it costs (read it from the tool's estimate) before you run it. Work in Blender itself is free.
Finishing
- Save the file (
nolgia_app_runwithbpy.ops.wm.save_mainfile()), never over a different file. - Export a short preview with
nolgia_app_export(mp4for motion,pngfor a still) so the person has it in their NOLGIA library, and show the still. - Tell the person, in a few lines: what you built, where it lives in the scene (collection names), the one or two controls they are most likely to adjust and where those are, and the path of the safety copy.
Build a scene in Blender
Lay out a shot from a brief: a set, the people and props in it, poses that read, light that fits the mood, and a small choice of cameras. Everything is separate and editable so the person can keep directing it.
Ask
- The setting and time of day. (Offer three quick options if the brief is vague.)
- Who and what is in it, and what is happening (one sentence of action).
- The look: realistic, stylised, or a reference image. If they give an image, ask whether it is for layout, for mood, or both.
- Which models do they already have? For anything missing, offer to make it with NOLGIA:
nolgia_generate_3dfrom a photo of the object or from an image made withnolgia_text_to_image. For a character, make a full-body image of them as a figure on a plain background, in the pose the shot needs (seated on a plain block if they sit; an A pose only if you will rig them), and turn that into the model; never work from a photo of a real person. Generated people bake the reference image's lighting into their texture and faces can read wrong, so plan to frame them so faces are not the main read (back light, profiles, shallow focus, details). Ifhunyuan3d-v3times out,trellisis the fast, cheap fallback. Say the rough credit cost before generating, and generate only what they agree to.
Build
- A plan first. Write a short shot plan back to the person: the set pieces, characters and props with their rough positions, the key light direction, and three camera ideas (wide establishing, medium on the action, a close or low angle). Wait for a yes or changes.
- Set. Block the space with simple geometry at real-world scale (metres): floor, walls or terrain, the big shapes that define the silhouette. Put it in
NOLGIA Set. Use the person's assets where they have them. - Bring in characters and props. Import each with
nolgia_app_import(GLB), shade smooth, scale to real size (people 1.6 to 1.9 m standing; seat to crown 0.8 to 1.0 m seated), place on the floor or seat (no floating, no clipping; hide a generated seat block inside the real seat), and put them inNOLGIA CastandNOLGIA Props. - Pose. Rigged characters: pose the armature bones for the action with the weight on the right foot, eyelines toward what they look at, hands touching what they hold. Unrigged generated characters: keep them as statues and say so; offer to rig later.
- Light. A key, a fill or bounce, and a rim or practical that motivates the mood; a world colour or an HDRI (make a sky or environment plate with
nolgia_text_to_imageif asked). A background plate goes far away as an emission plane: keep every camera inside its field of view, extend its sky if the wide sees above it, and match the sun lamp to the sun in the plate. Name every light for its job. Prefer natural, motivated light (sun, sky, bounce, practicals) unless the brief asks for a stylised look. - Cameras. Three cameras named for their framing (
Cam Wide,Cam Medium,Cam Close), each composed on thirds with a clear foreground, subject and background, 24 to 35 mm for the wide, 50 mm for the medium, 85 mm for the close. Add depth of field on the medium and close, focused on the subject's eyes, or on the action for a detail close (hands, an object).
Check
- Preview every camera. Each must read the action in one glance: subject sharp, eyeline clear, nothing important cut by the frame edge.
- Scale check in code: every standing character between 1.5 and 2.0 m tall (seated: seat to crown 0.8 to 1.0 m) unless the brief says otherwise; every object's lowest point within 1 cm of the floor or of the object it rests on (a lid on a bin, a crate on a crate).
Deliver
Save, export a png from each camera, and show them side by side so the person can pick. Tell them where things live (the three collections), which camera is active, and how to switch.
Try it in Blender.
Install the free NOLGIA plugin for Blender, sign in, then ask your agent.