Film assistant
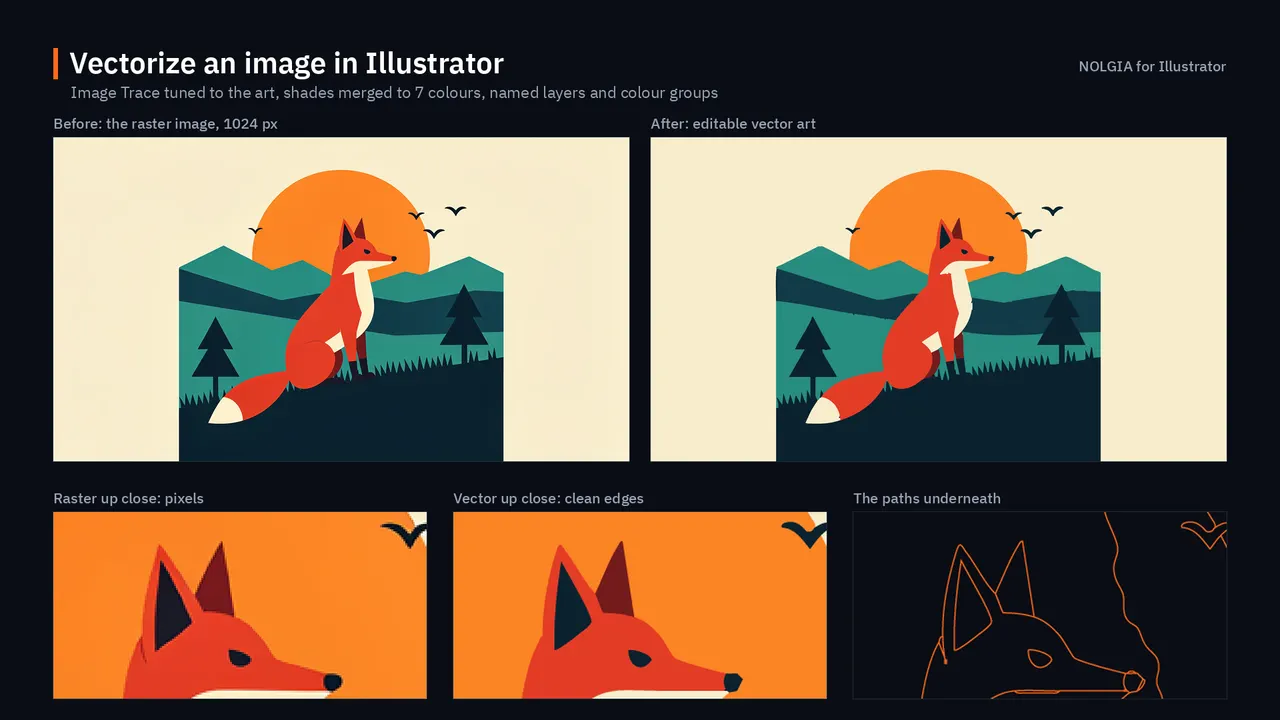
Vectorize an image in Illustrator
Turn a raster logo, illustration or poster into clean vector art in Illustrator, organized into named layers and groups, with the palette saved as swatches.
Runs in Illustrator on your computer
- Best for
- Logos, flat illustrations and posters that need to print or scale to any size.
- Runs in
- Illustrator 29.0 or later
- Time
- 10 to 20 min
- Cost
- The work in Illustrator is free. NOLGIA generation inside it is priced as usual.
Already have an account? Sign in
Create a free account and NOLGIA Agent opens with this preset. It works in Illustrator through the NOLGIA plugin.
Start it from your agent
Paste this into Claude Code, Claude Desktop, Cursor or any agent with NOLGIA connected, with Illustrator open. The agent follows NOLGIA's workflow for this preset step by step, and asks before it changes anything big.
Use NOLGIA to turn my image into clean, editable vector art in Illustrator, keeping its composition and colours, organized into named layers and groups.
In Claude Code it is also a command: /mcp__nolgia__illustrator-vectorize. Open in Claude needs NOLGIA added to Claude as a connector.
What it does
The NOLGIA assistant rebuilds your image as vector art that looks the same at any size. It looks at the image first and suggests trace settings for the kind of art it is, a flat logo, a detailed illustration, line art or a photo, then compares the trace with the original and tunes it. It merges nearly identical colors, cleans up stray specks without leaving holes, and organizes the result into named layers and groups by color and role.
The original image stays in the document, hidden and locked, and a safety copy of your file is saved first. The final colors are saved as a NOLGIA palette swatch group, so you can recolor the whole piece in one place. You get a PNG preview in your NOLGIA library, and an SVG on your computer if you want one.
You need Illustrator 2025 or later and NOLGIA for Adobe. The work in Illustrator is free. For a small, blurry image the assistant can offer a NOLGIA upscale first, priced as usual, and tells you the cost before it runs.
Use cases
- Turning a logo from a screenshot into a vector file
- Making a poster or an illustration print sharp at any size
- Getting editable art you can recolor from a generated image
The workflow
The written steps your agent follows in Illustrator, the same for every agent: the rules every Illustrator workflow keeps (a safety copy first, everything stays editable, a preview after each change), then this preset's own steps.
Read the workflow
Rules for every Illustrator workflow
These instructions are served to the agent with every Illustrator preset in the Film assistant category. The agent works through the NOLGIA Bridge tools (nolgia_app_*) on Illustrator running on the person's own computer. Code for nolgia_app_run is ExtendScript.
Before anything changes
- Call
nolgia_app_status. If Illustrator is not listed, stop and tell the person in two lines: install NOLGIA for Adobe from nolgia.ai/plugins, then open Window > Extensions > NOLGIA in Illustrator and sign in. Do not guess or continue without it. - Call
nolgia_app_info. Read what is really open: the documents, the active one's colour mode, artboards (numbered from 1, with sizes in points), layers and what is selected. Describe it back in one sentence so the person can correct you. - If the document has a path, make a safety copy first with
nolgia_app_exportformatai(it copies the document as last saved, next to it, and never overwrites a file). If there are unsaved changes, ask the person to save first. If the document was never saved, ask where to save it and save withnolgia_app_savepath. - Ask only the questions the workflow lists. Offer a sensible default for each so the person can just say "go".
While working
- Work in small steps: one
nolgia_app_runper logical step, each returning a short summary inresult(layer and group names, item counts). - Never delete, rename or restyle the person's existing artwork unless they asked. Put what you make on new layers named after the workflow, and hide (do not delete) anything you replace.
- Keep everything editable: live shapes and paths, named groups and layers, swatches for the colours you use. Expand or flatten only when the workflow says so.
- After each visible change, call
nolgia_app_preview(withartboard) and look at the image before moving on. Do not describe a result you have not seen. - If code fails, read the error (it names the line and shows it), fix the code and try once more. After two failures on the same step, explain what failed in plain words and ask how to proceed.
ExtendScript that bites (Illustrator)
- It is ES3: no
let,const, arrow functions, template strings,Array.prototype.indexOf,maporforEach, and noJSONobject. Words ES3 reserves (short,int,class,char,final,native...) cannot be variable names. Return data by settingresult(or as the last expression). - Collections count from 0 and index 0 is the top of the stacking order:
doc.layers[0],layer.pageItems[0]. They are live: when you delete or move items in a loop, walk backwards. - The y axis points up.
artboardRectis[left, top, right, bottom],geometricBoundsandvisibleBoundsare the same order, andpositionis the top left corner. - Colours are objects (
RGBColor,CMYKColor,SpotColor,GrayColor,NoColor), in the document's colour mode, which is fixed when the document is made. Compare colours by their channel values, not with==. doc.pathItemsincludes every path in the document, inside groups and compound paths too. A layer's or group'spathItemsandpageItemslist only its own direct children.- A hidden or locked layer refuses edits ("Cannot modify a layer that is locked"), even moving an item into it: show and unlock it first, then hide and lock it again.
- Layers have no
duplicate(): duplicate their items into a new layer. - After
item.remove()the reference is dead: reading or even comparing it throws "Object is invalid". Decide everything about an item before removing it. - An image opened as a document (
nolgia_app_importwith nothing open, ornolgia_app_openof a PNG) is not an Illustrator file yet: save it withnolgia_app_saveand a path ending in.ai. - Image Trace:
placedItem.trace()orrasterItem.trace()returns a PluginItem; setpluginItem.tracing.tracingOptions(tracingMode,tracingColorTypeValue,tracingColors,pathFidelity,cornerFidelity,noiseFidelity,tracingMethod,snapCurveToLines,ignoreWhite...; the preset names are inapp.tracingPresetsList), callapp.redraw()so it traces again, thenpluginItem.tracing.expandTracing()gives a GroupItem of paths. The trace replaces the image: duplicate the image first and trace the copy. - Menu commands work on the selection:
app.executeMenuCommand("Live Pathfinder Add")then"expandStyle"unites the selected shapes. - Scripts that touch thousands of items are slow. Read
.lengthonce, avoidapp.redraw()inside loops, and return counts rather than every item. doc.saveAs(file, options)makes that file the open document; saving a copy isnolgia_app_exportai.
Using NOLGIA where it helps
- A missing source image (a raster to vectorise, a texture, a reference) can be made with
nolgia_text_to_image, cleaned up withnolgia_image_to_image, and brought in withnolgia_app_import(embedded, on theNOLGIA importslayer). - These generations cost credits: say what you are about to make and roughly what it costs before you run it. Work in Illustrator itself is free.
Finishing
- Save the document (
nolgia_app_save), never over a different file. - Export a preview with
nolgia_app_exportpngso the person has it in their NOLGIA library, and show it. SVG and PDF exports stay on the person's computer (NOLGIA's library does not take them yet); give their paths. - Tell the person, in a few lines: what you built, where it lives (layer and group names), the one or two things they are most likely to adjust, and the path of the safety copy.
Vectorize an image in Illustrator
Rebuild a raster illustration, logo or poster as vector art that looks the same at any size: traced with settings tuned to this image, expanded into real paths, grouped and named by colour and role, with stray specks removed and the palette saved as swatches. The original image stays in the document, hidden.
Ask
- Which image? The selected or placed image in the open document (default), a file on their computer, or an image in their NOLGIA library (bring it in with
nolgia_app_import). - What kind of art is it? Look at it with
nolgia_app_previewfirst and suggest one: flat art or a logo (few colours, crisp corners), a detailed illustration (more colours, smooth curves), line art (black and white), or a photo (posterised look). (Default: your suggestion.) - What must stay most faithful: faces, lettering, thin lines, small details? Those get more path fidelity, or are rebuilt by hand after the trace.
- How many colours? (Default: the number of distinct flat colours you see, usually 6 to 16.)
Build
- Keep the original. If the image came in with nothing open, it opened as its own document: save it as a new
.aifirst (nolgia_app_savewith a path ending in.ai, next to the image). Rename its layerSource image, duplicate the image onto a new layerVector art(show and unlockSource imagewhile you duplicate: a hidden layer refuses edits), then hide and lockSource image. Only the copy is traced. - Trace the original, not an upscale. An AI upscale paints texture into flat areas, and the trace turns that texture into extra shapes and halos. Trace flat art and illustrations from the image as it is. Offer an upscale (NOLGIA's Topaz models, about 7 credits) only for small, blurry line art or photos, and compare both traces before keeping one.
- Trace with settings for this art.
trace()the copy, then settracing.tracingOptions, and callapp.redraw()so it traces again: - flat art or a logo:
tracingModecolour,tracingColorTypeValuelimited,tracingColorsone or two more than the flat colours you count,pathFidelityabout 75,cornerFidelity100,noiseFidelityabout 16 px,tracingMethodabutting,snapCurveToLineson; - detailed illustration: more colours,
pathFidelity85 to 95,noiseFidelity5 to 10,cornerFidelityabout 75; - line art: black and white mode,
thresholdset so thin lines stay whole,ignoreWhiteon; - photo: colour mode, 16 to 30 colours,
noiseFidelity10 to 20. Keep the abutting method: its shapes do not overlap, so they can be regrouped later without changing the picture. - Compare and tune. Preview the trace, then the source (hide one, show the other), and look closely at straight edges (they should stay straight), small shapes, lettering and the colours. Adjust fidelity, noise and colours, and repeat two or three times at most.
- Expand.
tracing.expandTracing()turns the trace into a group of paths. Name itVector art. - Merge near-identical colours. The trace splits one flat colour into two or three shades (
#f7ebccand#f7edcd). Give every path the colour of the shade that covers the most area, so the art has one colour per flat colour. Report the final palette. - Clean specks without making holes. In an abutting trace a small shape usually fills a hole in the shape around it, so deleting it leaves a pinhole. Recolour a speck of an odd colour to the colour around it instead, and if the person wants fewer paths, merge same-colour specks into the shape around them (select both,
app.executeMenuCommand("Live Pathfinder Add"), then"expandStyle"). Delete only white background shapes, and only when the person does not want a background. - Organise. Where the art has clear objects (a character, a logo mark, a sun), make a sublayer for each and one for what is behind them, and inside each a group per colour named for it, a plain colour name and the hex value (
Fox red #e33c26). Art without clear objects gets sublayers by role:Background,Shapes,Details,Lines. Order them back to front as the trace had them. - Look for flecks. Regrouping can bring a tiny shape to the front that was hidden before (two shapes on one spot), or show a hole whose filler you moved. Preview close-ups of busy areas and fix what you see: recolour a fleck to its surroundings, or remove the tiny hole sub-path from its compound path.
- Swatches. Add a swatch group
NOLGIA palettewith the final colours so the person can recolour the art in one place. - Rebuild what needs it. Lettering and small logos rarely trace well. If the person marked them as important, say so and offer to rebuild them as live text or clean shapes by hand, or leave them for the person.
Check
- Preview the vector art and the source at the same size, side by side (one preview each), and at least one close-up of the most detailed area. The composition, colours and the important shapes must match; no specks, holes or lost details.
- Look at a close-up of the busiest area at full width: no pinholes, no flecks of a colour that is not there in the source.
- Report the numbers: colours, paths, groups, and specks recoloured.
Deliver
Save as a new .ai next to the source (never over the source image or another file), export a png preview with nolgia_app_export, and an svg if the person wants one (it stays on their computer). Tell them: the layers and groups, how to recolour with the NOLGIA palette swatches, the trace settings used, and anything they may want to redraw by hand.
Try it in Illustrator.
Install the free NOLGIA plugin for Illustrator, sign in, then ask your agent.