
Film assistant
BetaClean up an image in Photoshop
Clean up a generated location image in Photoshop: remove what does not belong, repair smeared signs and warped textures, and match the light, with every fix on its own layer.
Runs in Photoshop on your computer
- Best for
- Generated location stills and backgrounds that need to hold up on a big screen.
- Runs in
- Photoshop 25.0 or later
- Time
- 15 to 30 min
- Cost
- The work in Photoshop is free. NOLGIA generation inside it is priced as usual.
Already have an account? Sign in
Create a free account and NOLGIA Agent opens with this preset. It works in Photoshop through the NOLGIA plugin.
Start it from your agent
Paste this into Claude Code, Claude Desktop, Cursor or any agent with NOLGIA connected, with Photoshop open. The agent follows NOLGIA's workflow for this preset step by step, and asks before it changes anything big.
Use NOLGIA to clean up my generated location image in Photoshop: remove what does not belong, repair smeared signs and broken textures, and match the light, keeping every fix on its own editable layer.
In Claude Code it is also a command: /mcp__nolgia__photoshop-image-fixer. Open in Claude needs NOLGIA added to Claude as a connector.
What it does
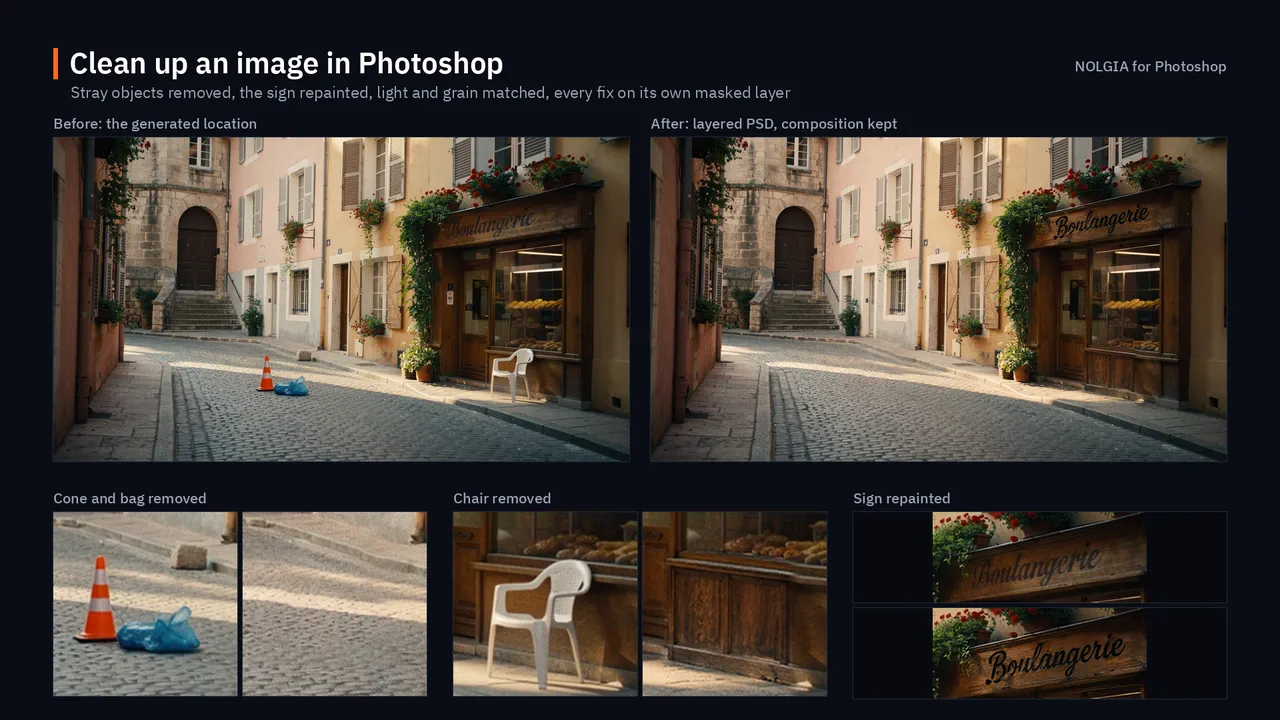
The NOLGIA assistant makes a generated location image hold up on screen without changing its composition. It reads the image, lists what does not belong and what looks generated, like stray objects, garbled signs or warped bricks, and lets you pick what to fix. Small removals use Photoshop's own Content-Aware Fill. Larger repairs, like repainting a sign so it reads properly, use a NOLGIA masked edit that changes only the areas you picked.
Every fix is its own named layer with a mask, inside one NOLGIA Cleanup group, matched to the light and grain around it, so you can adjust it or switch it off. Your original pixels are never touched, and a safety copy of the document is saved first. You get the finished image in your NOLGIA library, with before and after previews.
You need Photoshop 2024 or later and NOLGIA for Photoshop. The work in Photoshop is free. NOLGIA edits are priced as usual, and the assistant gives you the total for its plan before anything is generated.
Use cases
- Fixing garbled signs and lettering in a generated street scene
- Removing stray objects from a location still
- Getting a generated background ready for a composite
The workflow
The written steps your agent follows in Photoshop, the same for every agent: the rules every Photoshop workflow keeps (a safety copy first, everything stays editable, a preview after each change), then this preset's own steps.
Read the workflow
Rules for every Photoshop workflow
These instructions are served to the agent with every Photoshop preset in the Film assistant category. The agent works through the NOLGIA Bridge tools (nolgia_app_*) on Photoshop running on the person's own computer. Code for nolgia_app_run is UXP JavaScript (language: "uxp").
Before anything changes
- Call
nolgia_app_status. If Photoshop is not listed, stop and tell the person in two lines: install NOLGIA for Photoshop from nolgia.ai/plugins/photoshop, then open the NOLGIA panel from Photoshop's Plugins menu and sign in. Do not guess or continue without it. - Call
nolgia_app_info. Read what is really open: the documents, the active one's size, resolution, colour mode and bit depth, its layers (groups, masks, what is hidden or locked), the selected layer and any selection. Describe it back in one sentence so the person can correct you. If the image to work on is in the NOLGIA library instead, bring it in withnolgia_app_import: it opens as a new document when none is open. - If the document has a path, make a safety copy first:
nolgia_app_exportwithformat: "psd"saves<name>-copy.psdnext to it and never overwrites a file. If it was never saved (an image imported from NOLGIA, a new document), ask where to keep the working PSD, offer a default next to the person's other project files, and save it there with anolgia_app_runthat callsdoc.saveAs.psd(...)(see below), or ask the person to use File > Save As, and wait. - Ask only the questions the workflow lists. Offer a sensible default for each so the person can just say "go".
While working
- Change the document in small steps: one
nolgia_app_runper logical step, each settingresultto a short summary (layer names and ids, counts, bounds). Each run is one step in Photoshop's History, named "NOLGIA: run code", so the person can undo it in one go; a run that fails is undone for you. - Never delete, merge, flatten, rasterize or rename the person's own layers unless they asked. Work on copies and new layers, and put everything you add in a group named after the workflow (for example
NOLGIA Cleanup). - Keep everything editable: retouching on its own layers with layer masks, placed images as Smart Objects, colour and light as adjustment layers. No destructive filters on the original pixels.
- After each visible change, call
nolgia_app_previewand look at the image before moving on. If it looks wrong, fix it before the next step. Do not describe a result you have not seen. The preview shows the whole active document; to look closely at one area, duplicate a crop of it into a temporary document in a run, preview that, then close it without saving. - If code fails, read
error(it names the line of your code), fix it and try once more. After two failures on the same step, explain what failed in plain words and ask how to proceed.
Photoshop UXP that bites
- Every run already runs inside
core.executeAsModal, so edits work as they are. Do not wrap code incore.executeAsModalyourself: an error thrown inside it comes back as bare text with no line number. If you need a nested modal scope, use themodal(async (ctx) => ...)helper. batchPlaydoes not throw when a step fails; it returns{_obj: "error", message}and carries on. Use theplay([...])helper, which throws on the first failed step. Check what a step did (for example read the layer back) before relying on it.doc.layers.add()anddoc.createLayer()put the new layer at the top of the stack, inside the top group when the top item is a group, whatever layer is selected. To put a layer where you mean, select the layer it should sit above withplay([{ _obj: "select", _target: [{ _ref: "layer", _id: id }], makeVisible: false }])and make it withplay([{ _obj: "make", _target: [{ _ref: "layer" }], using: { _obj: "layer", name } }]), or move it afterwards withlayer.move(target, constants.ElementPlacement.PLACEBEFORE)(above) orPLACEAFTER(below);PLACEINSIDEputs it in a group.doc.createLayerGroup({ name })always makes the group at the top of the stack. To nest groups, move them in withgroup.move(parent, constants.ElementPlacement.PLACEINSIDE), which puts the moved layer at the top of the parent: move them bottom one first.- Deleting a layer leaves no layer selected; select one before the next step.
nolgia_app_importplaces the image right above the selected layer (inside its group), or at the top of the stack when none is selected. With a group itself selected it lands above the group, not in it: move it in afterwards. - Photoshop hands out a new object each time you read a layer, so compare layers by
id, never with===, and keep ids (not objects) between runs. The same goes for documents: keep the document'sidand find it withapp.documents.find((d) => d.id === id), because opening, duplicating or importing changesapp.activeDocument. - Fill, Content-Aware Fill, filters and adjustments act on the selected layer, inside the selection when there is one. Content-Aware Fill needs pixels on that layer (it does nothing on an empty layer): duplicate the source layer, fill inside the selection on the copy, then give the copy a mask of just the patch.
- In descriptors,
RGBColortakesred,grain(green) andblue, 0 to 255. - A layer's
boundsare what its mask lets through. A layer whose mask hides everything reports zero bounds. - Placing an image clears the selection (
nolgia_app_importputs it back). Keep a selection you need across steps in a channel, or rebuild it. - Code runs on Photoshop's one JavaScript thread. A loop that never awaits freezes Photoshop and nothing can stop it.
timeout_secondsonly stops NOLGIA waiting; keep each run short. - While a dialog is open in Photoshop (a save prompt, a filter's settings, the Graphics Processor notice at startup) Photoshop is busy: changes fail, and
runsays so and runs your code outside the modal scope, where it can only read. Ask the person to close the dialog, then run the step again. await app.documents.add(...)makes the document and makes it active, but what it returns is not reliable:null, or even the document that was active before. Useapp.activeDocumentright after it (check its name).doc.pathis empty until the document is saved. Save withdoc.save()ordoc.saveAs.psd(entry, options, asCopy);nolgia_app_runhasfs(the UXP local file system, full access) to get entries:await fs.getEntryWithUrl("file:/C:/Projects/shot.psd")for an existing file,await (await fs.getEntryWithUrl("file:/C:/Projects")).createFile("shot.psd", { overwrite: true })for a new one.
Recipes that work (Photoshop 2026)
- Select a layer:
play([{ _obj: "select", _target: [{ _ref: "layer", _id: id }], makeVisible: false }]). - Copy the original into a group:
await original.duplicate(group, constants.ElementPlacement.PLACEINSIDE, "Remove: cone"). - Selections:
doc.selection.selectRectangle({ left, top, right, bottom }),selectEllipse(...),selectPolygon([{ x, y }, ...]); passconstants.SelectionType.EXTENDas the second argument to add to it. Grow it withplay([{ _obj: "expand", by: { _unit: "pixelsUnit", _value: 5 }, selectionModifyEffectAtCanvasBounds: false }])and soften it with the same step as{ _obj: "feather", radius: { _unit: "pixelsUnit", _value: 2 }, ... }. - Content-Aware Fill inside the selection, on the selected layer:
play([{ _obj: "fill", using: { _enum: "fillContents", _value: "contentAware" }, contentAwareColorAdaptationFill: true, opacity: { _unit: "percentUnit", _value: 100 }, mode: { _enum: "blendMode", _value: "normal" } }]). The samefillwith_value: "black","gray"(50% gray) or"color"pluscolor: { _obj: "RGBColor", red, grain, blue }fills plainly;play([{ _obj: "delete" }])clears the selection on a normal layer. - Mask the selected layer to the selection:
play([{ _obj: "make", new: { _class: "channel" }, at: { _ref: "channel", _enum: "channel", _value: "mask" }, using: { _enum: "userMaskEnabled", _value: "revealSelection" } }]); remove a mask withplay([{ _obj: "delete", _target: [{ _ref: "channel", _enum: "channel", _value: "mask" }] }]). - An adjustment layer, right above the selected layer:
play([{ _obj: "make", _target: [{ _ref: "adjustmentLayer" }], using: { _obj: "adjustmentLayer", name, type } }])withtypesuch as{ _obj: "curves", presetKind: { _enum: "presetKindType", _value: "presetKindCustom" }, adjustment: [{ _obj: "curvesAdjustment", channel: { _ref: "channel", _enum: "channel", _value: "composite" }, curve: [{ _obj: "paint", horizontal: 0, vertical: 0 }, { _obj: "paint", horizontal: 128, vertical: 121 }, { _obj: "paint", horizontal: 255, vertical: 255 }] }] }or{ _obj: "photoFilter", color: { _obj: "RGBColor", red: 236, grain: 138, blue: 0 }, density: 18, preserveLuminosity: true }(warming). Made while a selection is active, it takes the selection as its mask. Clip it to the layer below withplay([{ _obj: "groupEvent", _target: [{ _ref: "layer", _enum: "ordinal", _value: "targetEnum" }] }]). - Noise on the selected layer:
play([{ _obj: "addNoise", distort: { _enum: "distort", _value: "gaussianDistribution" }, noise: { _unit: "percentUnit", _value: 4 }, monochromatic: true }]). - Blend mode and opacity:
layer.blendMode = constants.BlendMode.OVERLAY,layer.opacity = 55.
Using NOLGIA where it helps
- Photoshop's own tools come first: Content-Aware Fill for small removals, healing on a copy layer, adjustment layers for light and colour. They are free and stay on the person's computer.
- For a larger change (repainting part of the scene, a new sky, a surface that needs real detail) use a NOLGIA masked edit: export the document with
nolgia_app_export(png), make a mask PNG the same size whose transparent pixels mark the area to repaint (a new document with a transparent background, filled black, with the area deleted;pngexport keeps the transparency), export that too, then callnolgia_image_to_imagewith the first asimage_url(its signed URL fromnolgia_get_asset) and the mask asmask_asset_idon a model that publishesimage.inpaint_mask(gpt-image-2.5-flareorgpt-image-2.5-sunburst; checknolgia_list_models). The model redraws the whole picture (sharper and often a little brighter, at a larger size) but keeps it aligned. Bring the result in withnolgia_app_import: an image with the document's shape lines up with the canvas exactly. Mask it to just the repaired things so everything else stays the person's original pixels. - These generations cost credits: say what you are about to make and roughly what it costs (read it from
nolgia_list_modelsor the tool's estimate) before you run it. Work in Photoshop itself is free. - Photoshop's Generative Fill uses the person's Adobe generative credits and has no scripting interface NOLGIA supports. If they prefer it, make the selection and the target layer ready, ask them to click Generative Fill and type the prompt you suggest, and continue once they say it is done.
Finishing
- Save the document with a
nolgia_app_runthat callsawait doc.save(), never over a different file. - Export a
pngorjpgwithnolgia_app_exportso the person has the result in their NOLGIA library, and show it. - Tell the person, in a few lines: what you changed, where it lives in the document (group and layer names), how to switch a fix off (hide the layer or paint its mask), and the path of the safety copy.
Clean up an image in Photoshop
Refine a generated location image so it holds up on screen: stray objects gone, smeared signs and warped surfaces repaired, light and grain consistent, the composition unchanged. Every fix is its own layer with a mask inside one group, so the person can see, adjust or switch off each one, and the original pixels are never touched.
Ask
- Which image? (Default: the active document. If it is in the NOLGIA library, bring it in with
nolgia_app_import.) Preview it and read it carefully first. - What should go? Give a short numbered list of what you see that does not belong (stray objects, doubled or melted details, people or cars that break the shot) and let the person pick by number. (Default: everything on your list.)
- Which textures and surfaces need repair? List what looks generated: smeared or garbled signs, warped bricks or tiles, repeating patterns, melted edges. For each sign, ask what it should say, or whether it should be plain. (Default: signs become clean and plain, surfaces match their surroundings.)
- The light: keep it as it is, or a time of day, direction and mood (for example "late afternoon sun from the left, warmer"). How strong? (Default: keep the light, only match fixes to it.)
- Photoshop only (free), or NOLGIA edits where they do better (about 8 credits each with
gpt-image-2.5-flare)? Give the total for your plan before anything is generated. (Default: Photoshop first, NOLGIA for the fixes Photoshop cannot do well, with the cost agreed first.)
Build
- Set up without touching the original. Make the safety copy (see the rules above) and save the working PSD. Keep the original layer as it is at the bottom (a background layer stays locked; that is fine). Make one group
NOLGIA Cleanupabove it for everything you add, with inner groupsRemove,RepairandLight, in that order from the bottom (groups are made at the top level; move each intoNOLGIA Cleanup,Removefirst). Note the document id and the ids of the original layer and the groups: every later step finds them by id. - Remove, one item per layer. For each item: duplicate the original layer into
RemoveasRemove: <item>and select the copy; select the item generously (a rectangle, ellipse or polygon a few pixels outside its edge, including its shadow), expand the selection 4 to 8 px, run Content-Aware Fill on the copy, feather the selection 2 px and give the copy a mask revealing only the selection. Preview a close crop. On open ground (cobbles, pavement, grass, sky) this is usually invisible. If the fill looks cloned or smeared (structure behind the object, such as a shopfront, doorway or railing), use a NOLGIA masked edit (step 3) for that item instead and say so. - Repair with NOLGIA masked edits. For the signs and surfaces the person picked (and removals Photoshop cannot fill well), in one edit when they sit apart from each other (one edit, one price):
- Export the document as
pngwithnolgia_app_export(after the removals, so the edit sees them done). - Make the mask:
app.documents.add({ width, height, resolution, mode: "RGBColorMode", fill: "transparent", name: "NOLGIA edit mask" })with the document's size, then work onapp.activeDocument(see the rules above); fill it black, and for each area select a rectangle a few pixels larger than the damage (the whole lettering of a sign, the whole object to remove with its shadow) and delete it. Export it aspng(it is the active document now; the export keeps the transparency), then close it without saving. - Call
nolgia_image_to_imagewith the document's signed URL asimage_url, the mask asmask_asset_id,gpt-image-2.5-flare, the document's aspect ratio, and a prompt that numbers each fix, says what should be there, and asks to keep everything else ("1) remove the white plastic chair in front of the bakery: show the wooden lower panel and the sunlit pavement behind it; 2) repaint the sign so it reads Boulangerie in crisp dark script, same size and slant; keep everything else exactly as it is"). Show the person the result before you place it. - Import it with
nolgia_app_import, move it intoRepair, name itRepair: <what>, and give it a mask of the repaired things, feathered 2 to 3 px. Make that mask cover each whole thing you repaired, not only the area NOLGIA was asked to repaint: new lettering can run past it (a sign cut off atBoulangerineeds the whole sign board in the mask). - Match each patch to the plate. Preview each patch close up next to its surroundings. When a patch is brighter, darker or a different colour, select it and add a Curves adjustment layer
Match: <what>clipped to it, and nudge it until the edges disappear. NOLGIA edits tend to come back a little brighter and cleaner than the plate (in testing, about 7 levels out of 255): start by lowering the midtones that much, and keep the grain step below. - Light. Only if the person asked for a change: add adjustment layers named for their job and move them into
Light: a warming Photo Filter (density 15 to 25) for warmth over the whole frame (no selection), and for direction a gentle Curves lift made while a big selection is active: a rectangle that runs off the canvas on the sun side and ends about half way across, feathered 200 px, so the lift fades out away from the sun. Keep each adjustment gentle; stack them rather than pushing one. - Grain. Add a layer
Grainat the top ofNOLGIA Cleanup: filled 50% gray, monochromatic Gaussian Add Noise about 3 to 5%, blend mode Overlay, opacity about 50% and then by eye, so the patches and the plate have the same texture in a 100% crop. Mask it to the patched areas if the plate already has strong grain elsewhere.
Check
- Preview the whole frame, then a close crop of every fix. Look for cloned patterns, hard or haloed mask edges, patches brighter or smoother than their surroundings, signs that still read as garbled, lines that bend where they should be straight.
- Hide
NOLGIA Cleanup, preview (before), show it, preview (after), and compare: the composition, the camera and everything the person did not ask about must be the same. nolgia_app_info: the original layer is unchanged, every fix is a named layer or Smart Object with a mask insideNOLGIA Cleanup, nothing is flattened or rasterized.
Deliver
Save the PSD, export a full-size png (and a jpg if they want a smaller file), and show the before and after previews side by side. Tell the person which layer holds each fix and how to adjust one (paint its mask white to show more, black to show less; hide a layer to switch the fix off), what NOLGIA generated and what it cost, and where the safety copy is.
Try it in Photoshop.
Install the free NOLGIA plugin for Photoshop, sign in, then ask your agent.